Conquer the Challenge: A Streamlined Guide to Connecting MongoDB to Your Node Application
After creating my MongoDB Atlas account and setting up my MongoDB Atlas cluster for the first time, a big challenge arose. I didn't know what to do next. I asked myself, how can I connect to my database? What is the process for inserting data into the database? What are the options for querying the database? Those were the few questions that popped into my head. As soon as I realized these questions had to be answered, I began looking for answers. That's when I realized I needed a connection string to establish a successful connection between my Node.js application and my MongoDB cluster.
The purpose of this article is to provide you with the necessary information on how to seamlessly connect your Node.js application to your MongoDB Atlas Cluster, revealing the full potential of a scalable and flexible database solution. From creating the connection string to establishing a successful connection integration, we'll help you make sure your application communicates efficiently with MongoDB.
Prerequisites
To follow along with this article and seamlessly connect your MongoDB Cluster to your Node application, the following are necessary:
Installation of Node and NPM on your machine.
Basic understanding of JavaScript, Node.js, and Express.js.
Have a MongoDB Atlas account and already set up a Cloud Cluster. You can get the guide here if you haven't already.
What is a Connection String?
A MongoDB connection string is a piece of text that instructs the MongoDB client such as your Node.js application on how to establish a connection with the MongoDB cluster. In other words, it serves as a secret passcode that connects your Node.js application to the MongoDB cluster.
A connection string contains vital encoded information, such as the cluster's servers, the database user's password and username, and the name of the database used for query execution. The database driver requires all of these to locate and connect to the database.
Now that we understand what a connection string is and how vital it is for establishing a seamless connection, we need to retrieve it and use it to connect our Node.js application to our MongoDB cluster. To accomplish this, we will break this guide down into 3 sections:
Find the MongoDB Connection String.
Setting up the Development Environment for a Node.js application.
Connecting a Node.js application to a MongoDB cluster.
Find the MongoDB Connection String.
Before we can obtain the connection string, we must first determine who will have access to our database and prevent others from altering it.
As you can see, a user is already available. We have already set up our MongoDB Cluster by providing a database username and password. If you skip that step or want to grant another user access to the database, then click the Add New Database User button.
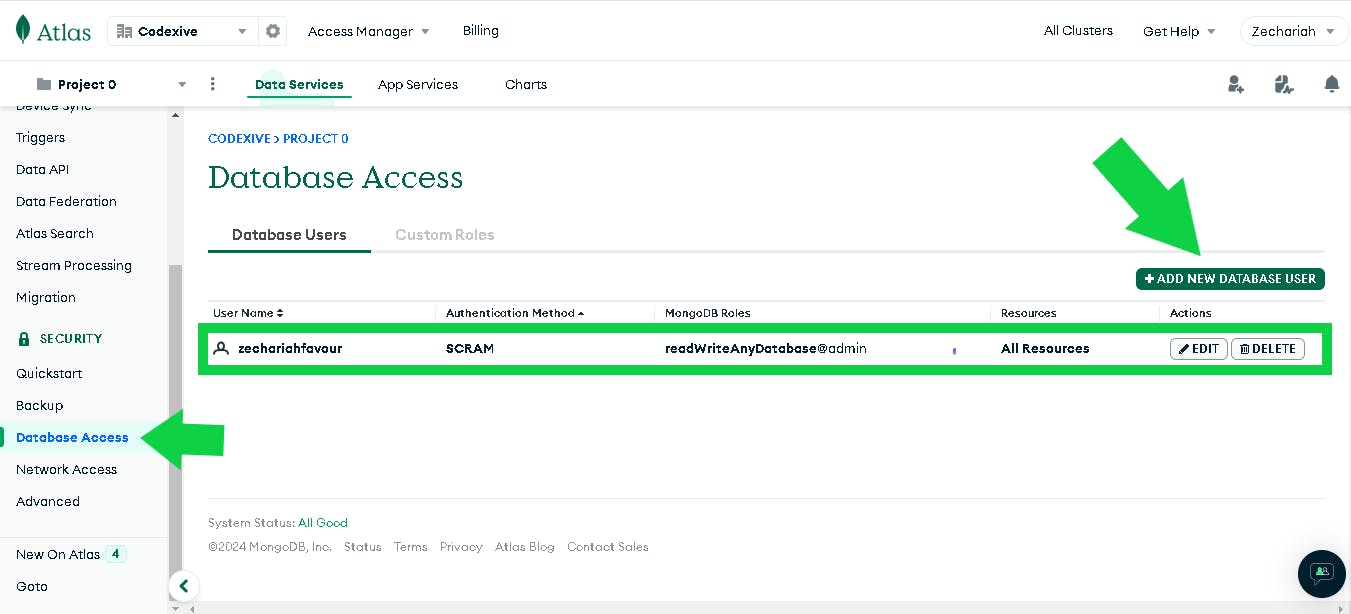
After clicking the Add New Database User button, a modal will appear. Specify the new user's credentials, such as their username and password.
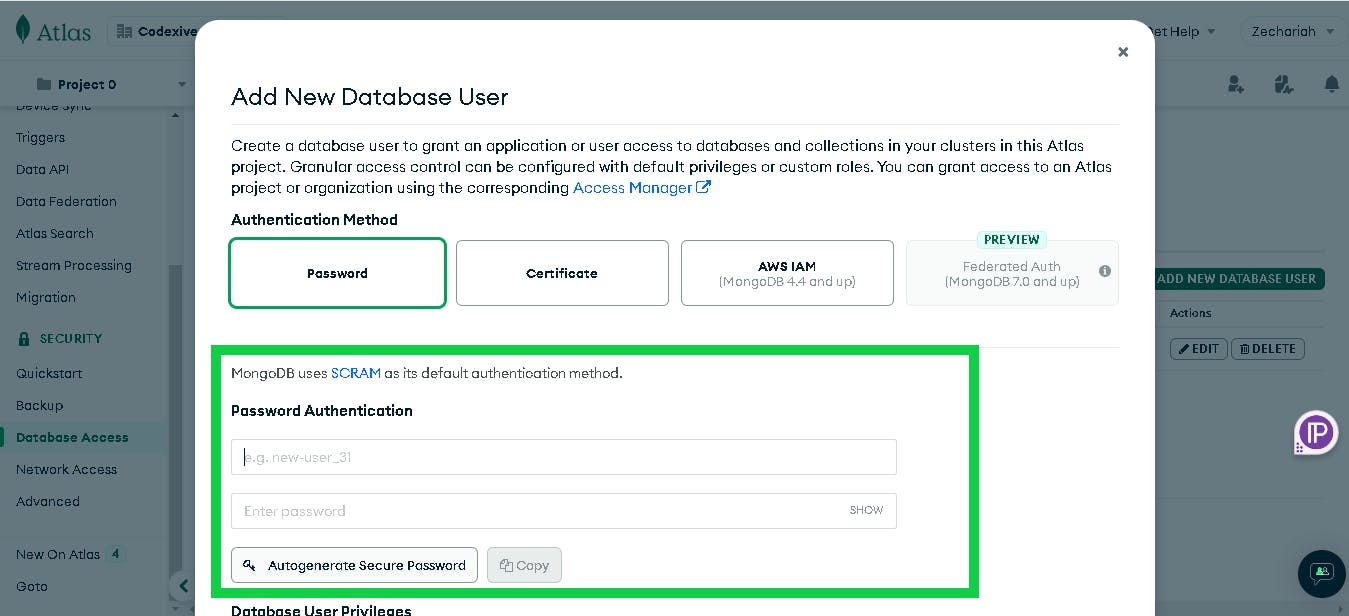
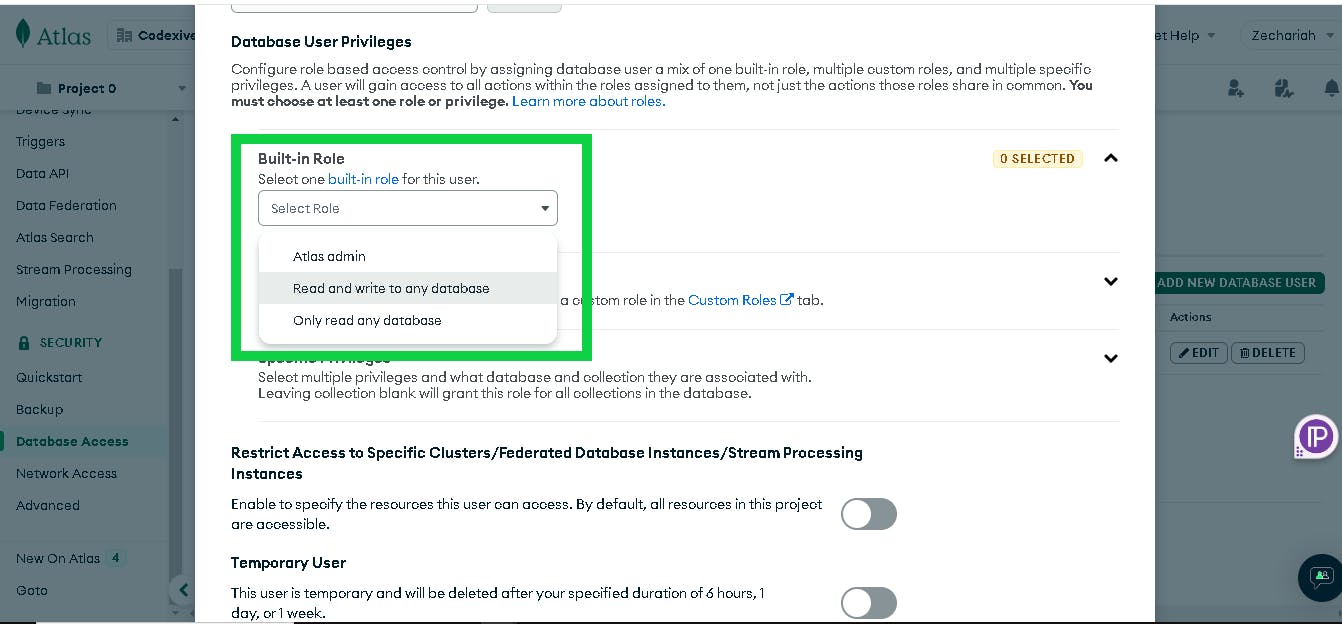
To configure database privileges for the new user, scroll down the modal after adding the new user credential. Click the Add a Built-in Role button.
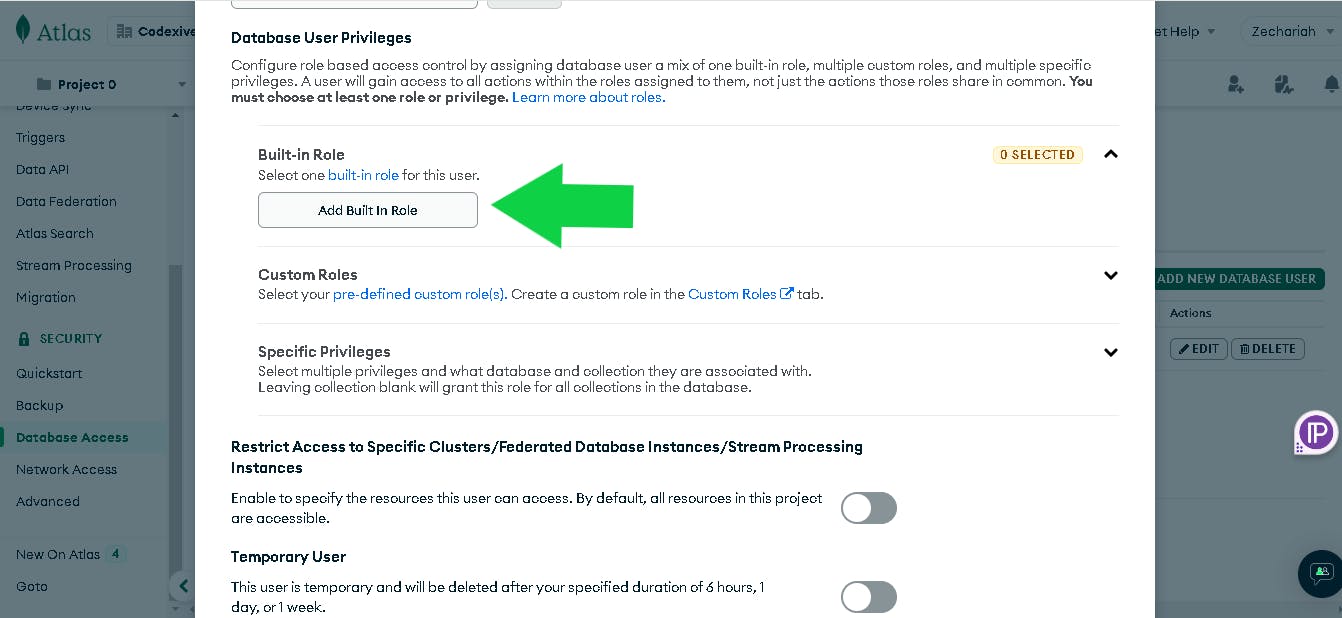
Select the appropriate role for that user from the selection list. To complete the process, click the Add User button after adding the new user to the database.
Note: Before saving, a role must be selected for the new user, else even if the user's credentials are valid, they will not be able to connect to the MongoDB cluster.
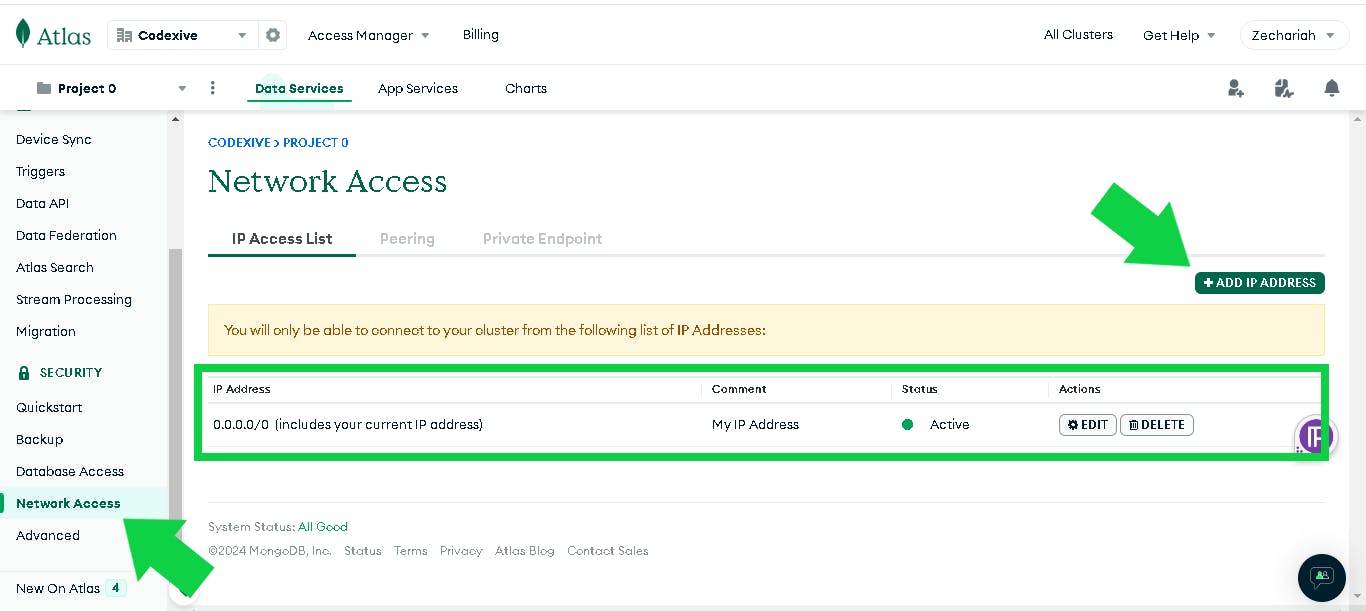
Next, we'll set up Network Access, which specifies where we may access our database from. As you can see, an IP address is already available when we set up our MongoDB cluster, we included the IP address from which we will access our database. If you have skipped that step when setting up your cluster or you want to add an IP address to access the database, click on the Add IP Address option.
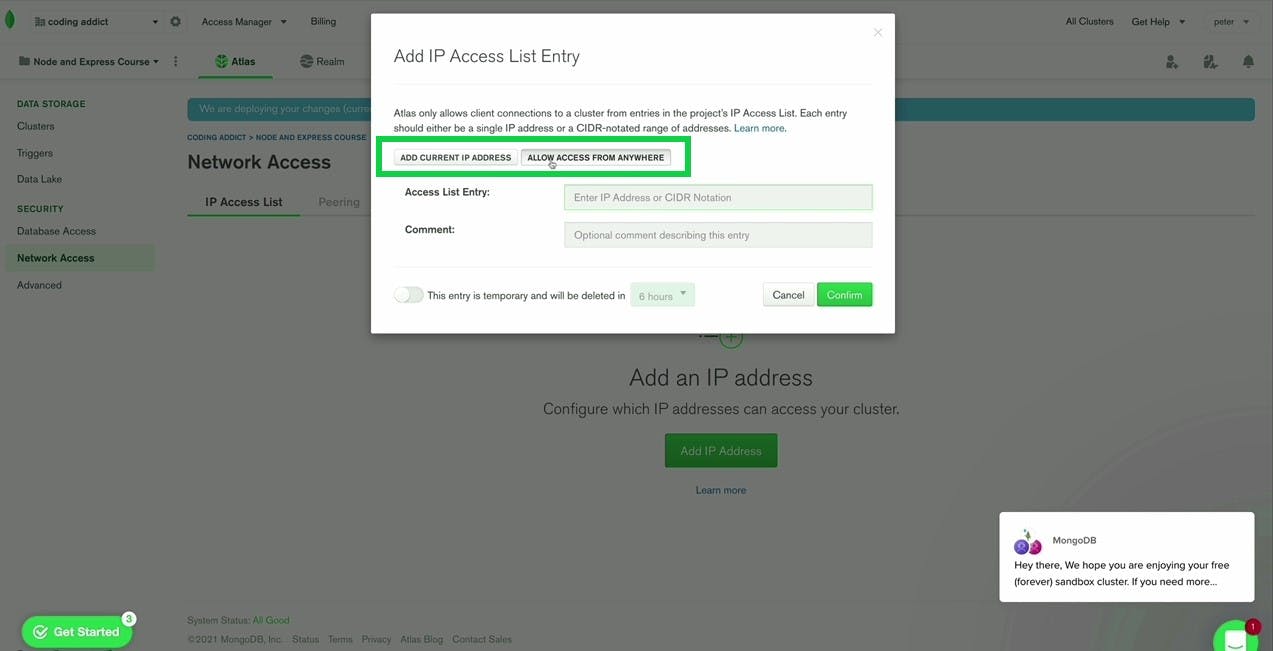
After hitting the Add IP Address button, a modal will appear allowing us to choose where we will access our database. Because we will be working locally at first, we can provide database access to our machine's current IP address, but once we deploy the web service, we must change the IP address to the host IP address, or we can choose Allow Access from Anywhere, which I recommend using when working locally.
To connect to our Node.js application, which we will be developing shortly, we need to retrieve our connection string.
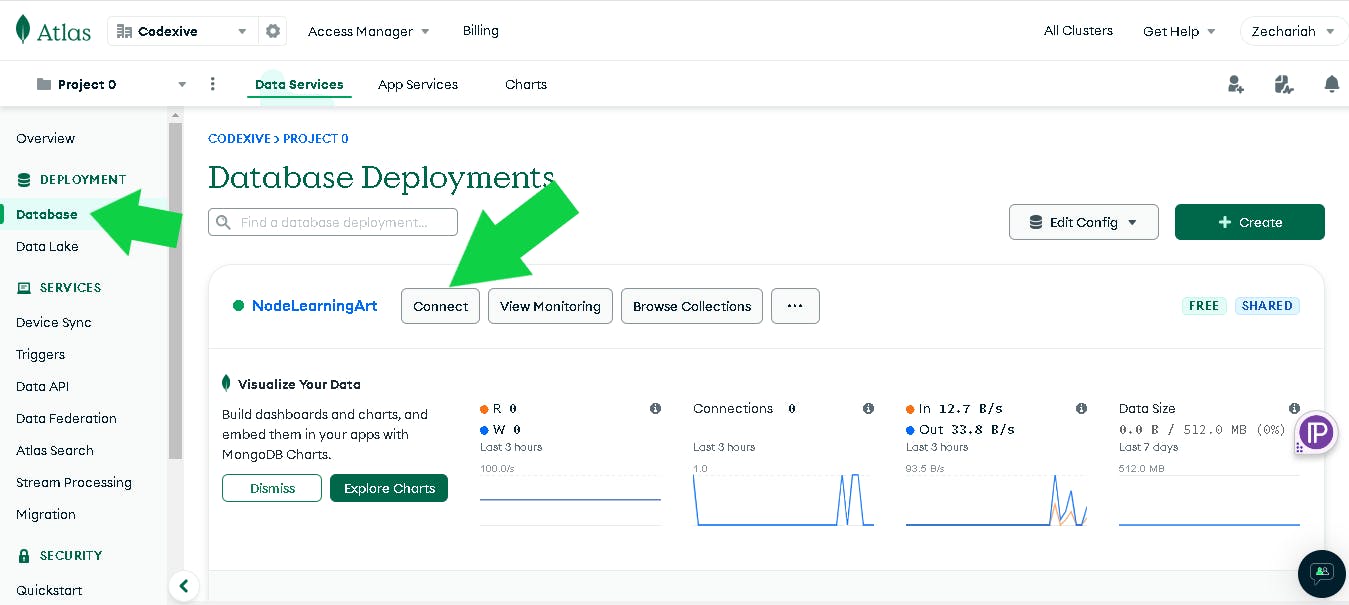
In the Deployment section of the Sidebar, click on Database. This will take you to the MongoDB cluster that we have already created. To retrieve our connection string, we'll need to click the Connect button.
Once we click Connect, a modal will appear. Since we want to connect to our application immediately and without stress, we will use the MongoDB native driver option.
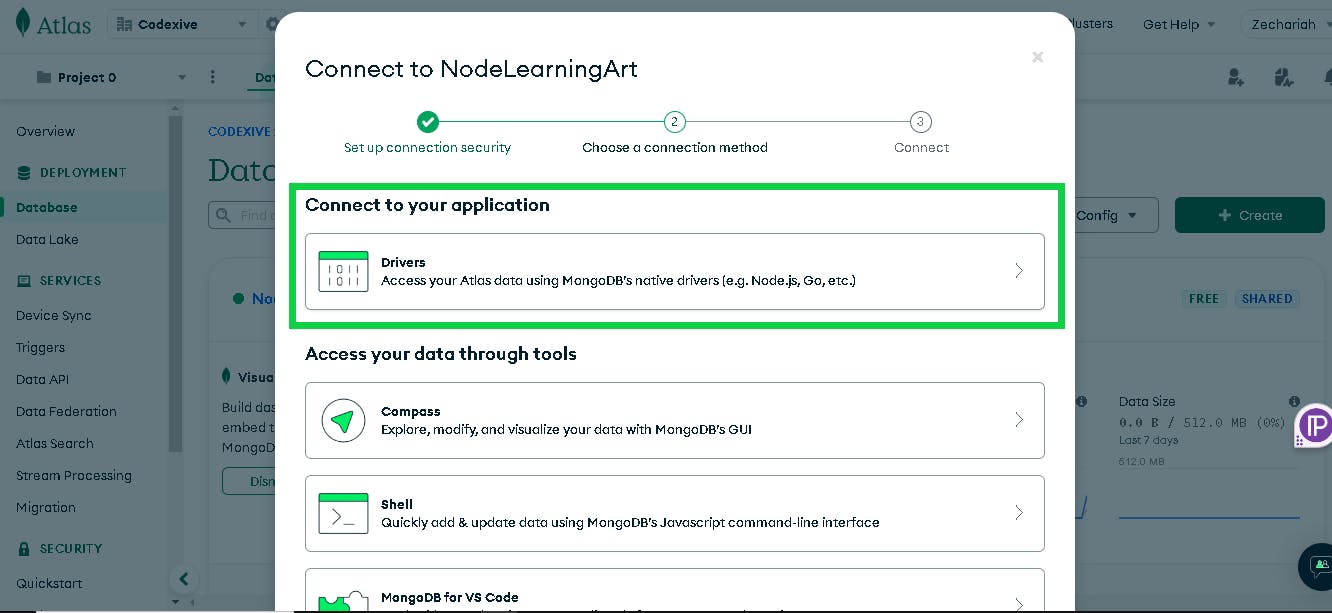
Next, we'll choose the connection method we'll use:
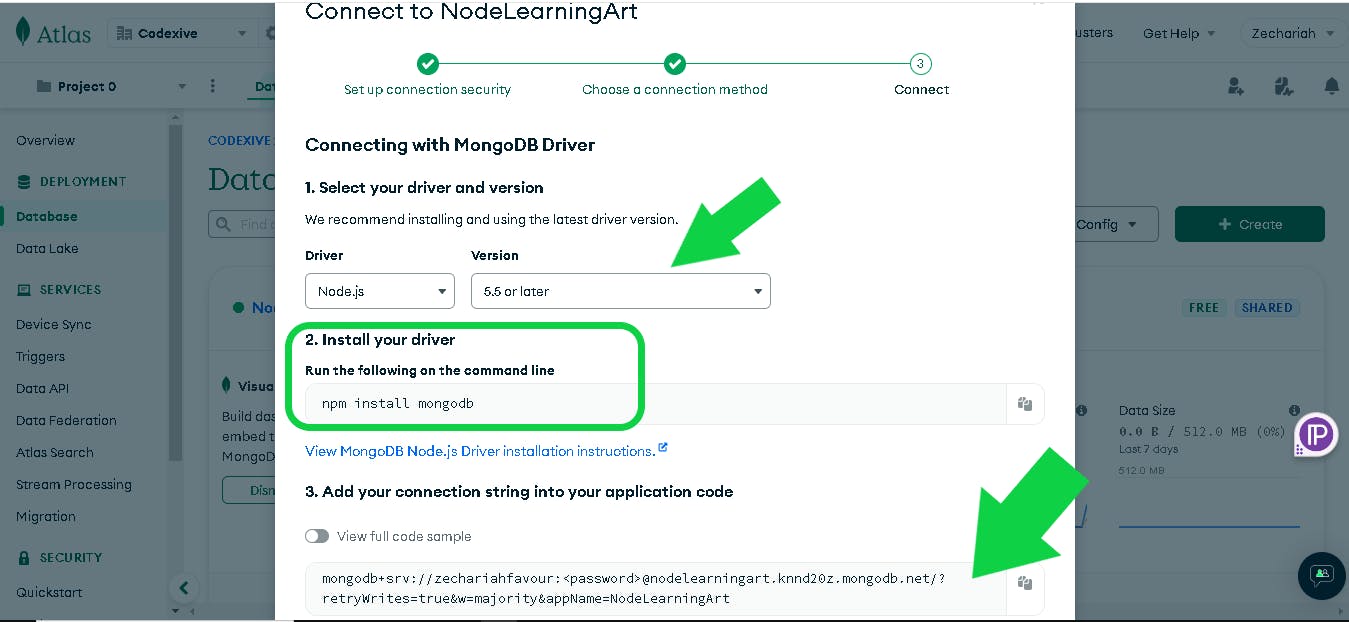
Select the latest Node.js driver and version.
Use the command to install the driver package.
Copy and keep the connection string for connecting the Node.js app to the MongoDB cluster very close to you.
We have now successfully configured our MongoDB Cluster's network and database access, as well as obtained our connection string. We'll be building our Node.js application.
Setting up the Development Environment for a Node.js application
In this guide, we will use VSCode, but any text editor should work. To begin, let's create our Demo Node.js application and install the required dependencies. To make things easier, we'll divide this piece into 2 sections:
Project Setup and Dependency Installation.
Create a Basic Express Server
Project Setup and Dependency Installation
Open the terminal or command prompt on your machine and run the following commands:
cd Desktop
mkdir demo-app && cd demo-app
touch app.js
npm init –y
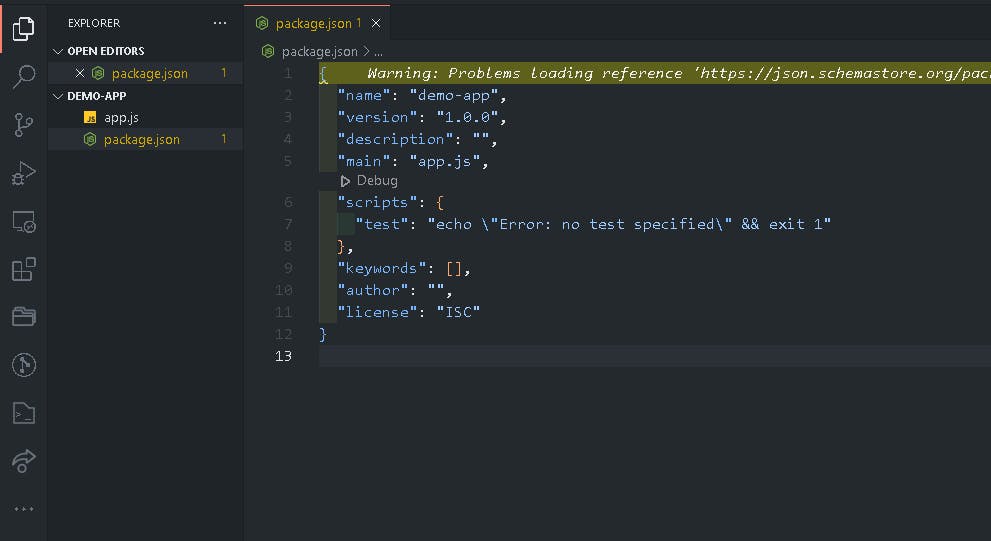
After running the commands above correctly, your node.js application should look like this in VSCode.
Create a Basic Express Server
To set up a basic express server for Node.js, type this command in your terminal.
npm install express
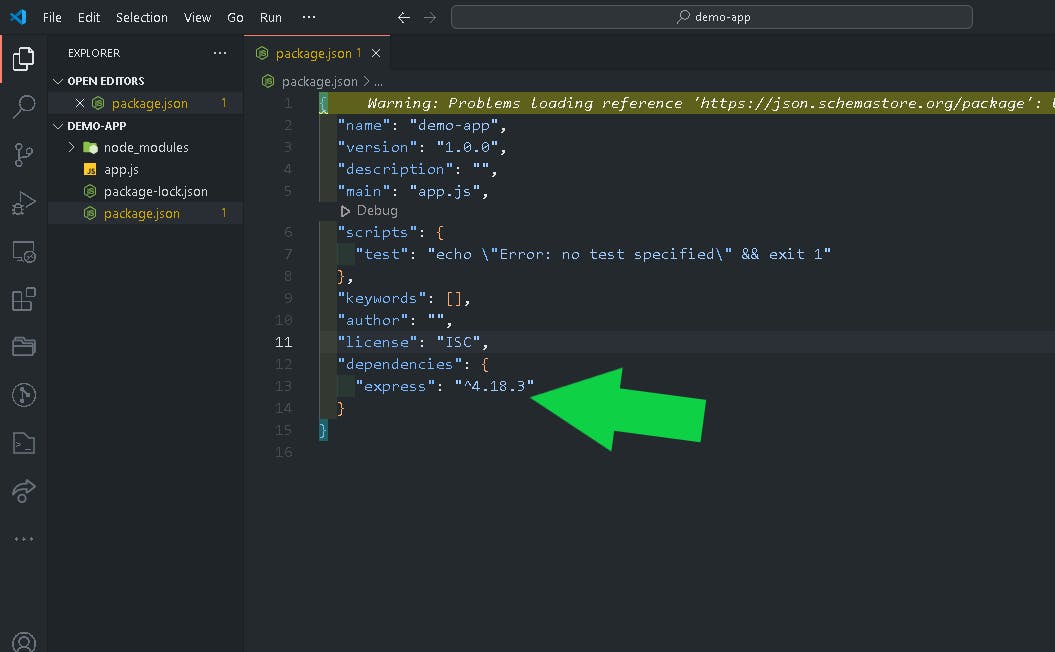
Express framework helps developers develop APIs using Node.js. Once installed, Express should be present in the dependencies object.
For our server to run inside of the app.js file, we must import express, initialize it with a variable, create routes, and listen to port 5000.
const express = require("express");

const app = express();

app.get("/", (req, res) => {
  res.status(200).send("Welcome To The Demo App");
});

const port = 5000;
app.listen(port, () => {
  console.log(`Server Running on port ${port} `);
});
As a next step, we'll add a new start script to the package.json file to make it easy to execute the Demo-App project. The node app.js command restarts our server whenever we make changes to the file. However, we can fully avoid this by running our development server on Nodemon.
npm install -D nodemon
Insert the following script into the package.json file.
"scripts": {
    "start": "nodemon app.js"
  },
The package.json file should look like this
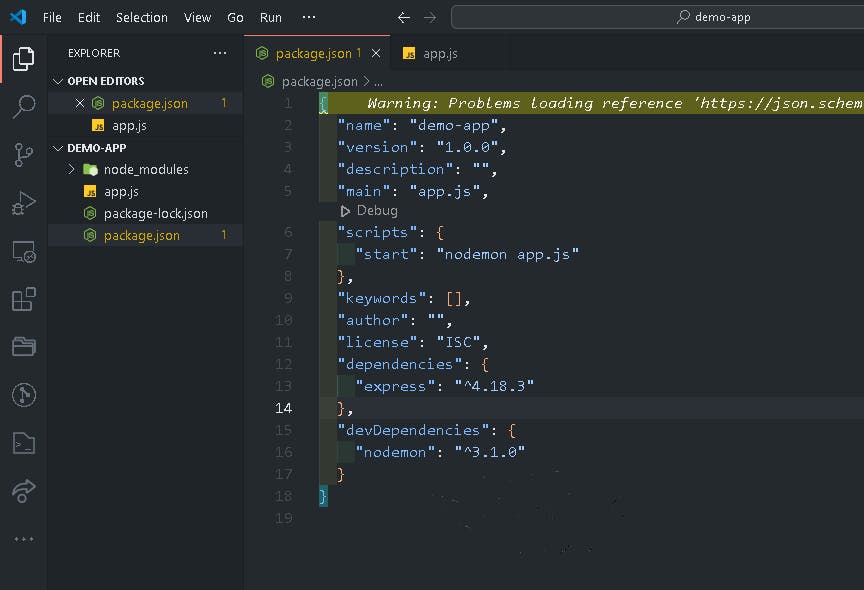
To see if everything is working properly, execute the project using the following command:
npm run start
Note: Always move to the root directory before running the server.
The message in the console indicates whether or not the above command launches the express server, from what we can see our Express server is running.
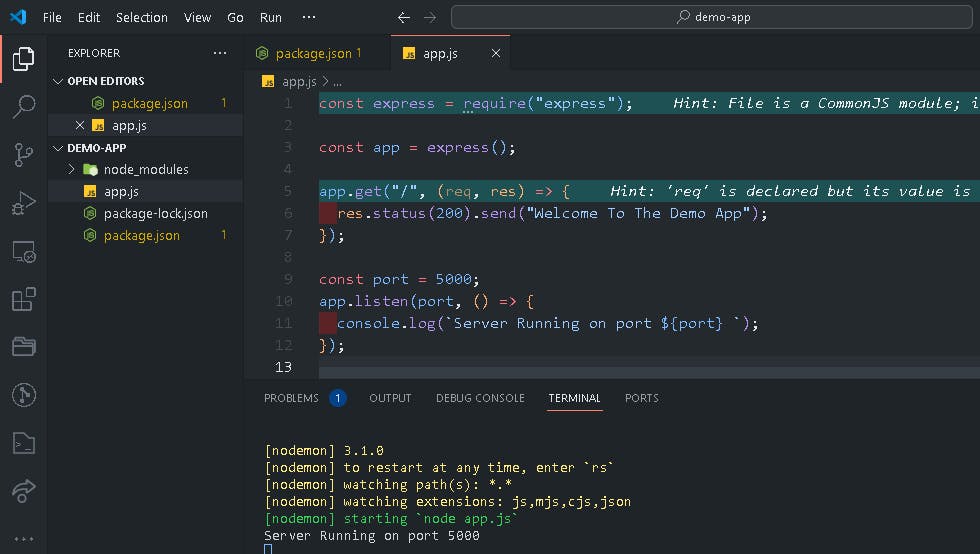
Also, if we go to the URL http://localhost:5000/ in our browser, we will get the image below:
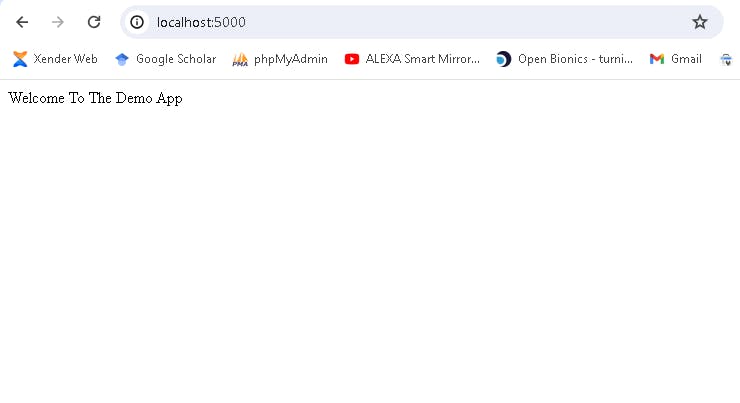
Great! The project is set up and operating nicely. The next section will be to link our node.js application to our MongoDB cluster.
Connecting a Node.js application to a MongoDB cluster.
We will now connect our MongoDB cluster to our Node.js application using the connection string we obtained before. To begin this phase, we will install the dependencies necessary for our project.
npm install mongoose dotenv
Which will install the following packages:
Mongoose: An ODM (Object Data Modeling) library for MongoDB.
Dotenv: loads environment variable from a .env file.
Create a .env file to safely store sensitive information like the connection string. Open a terminal and run the following command:
touch .env
Note: Always create this file in the root directory
In the.env file, assign a variable to the MongoDB cluster connection string.
MONGO_URL: <Your MongoDB Connection String>

Setting up MongoDB Connection Function
Next, create a folder called db, and inside it, create a connect.js file. We can also accomplish this in the terminal by using the following command:
mkdir db && cd db
touch connect.js
We need to create a function in the connect.js file that will establish a connection between our database and the node.js application so that we can access the MongoDB database on our express server.
const mongoose = require("mongoose");

const connectDB = (URL) => {
  return mongoose.connect(URL);
};
We imported the Mongoose package into the code above. Next, we define a connectDB function that returns the connect() method in Mongoose, which is a Promise. The URL represents our connection string, which will be obtained from the .env file. Finally, export the connectDB function, as we will need it in our entry file to configure our simple express server.
Updating the Entry File of our Express Server
Next, modify the app.js file. Import the dotenv package to retrieve the values stored in our.env file. Inside app.js, write a function that will connect to the database and start our Express server only when the connection is successful.
// ADD CODE INTO app.js File (entry point)

require("dotenv").config();
const connectDB = require("./db/connect");

const startConnection = async () => {
  try {
    await connectDB(process.env.MONGODB_URL);
    app.listen(port, () => {
      console.log(`Server Running on port ${port} `);
    });
  } catch (error) {
    console.log(error);
  }
};
startConnection();
The startConnection function in the preceding code uses async/await since our connectDB function produces a Promise that might be resolved or denied. Once the asynchronous function is resolved and the database connection is made, our Express server will start automatically.

If you get the above message in your terminal after running your Demo-App project, you can be certain that you have linked and synchronized your database with your application, and that everything is working properly.
Conclusion
Viola! We have successfully connected our MongoDB Cluster to our Node.js application (Demo-App). Now you can easily follow this process to connect your database to your node application. If you have found this helpful, please consider sharing it with others who might benefit.
Thank you for Reading.
